That telltale squealing sound coming from under your hood? It might just be your serpentine belt begging for attention. A worn or broken serpentine belt can leave you stranded, but replacing it yourself is a manageable task for the average DIY enthusiast. But when is it time to throw in the towel and call in the pros? Let's dive in!
Let's face it, car troubles are never fun. The fear of the unknown, the potential for a hefty repair bill, and the inconvenience of being without your vehicle can all add up to a stressful experience. Tackling a repair yourself can be empowering, but also daunting, especially when you're unsure of the proper steps or potential pitfalls.
This guide aims to empower you with the knowledge and confidence to decide whether you can tackle a serpentine belt replacement on your own, or if it's best to seek professional help. We'll cover the tools you'll need, the steps involved in the replacement process, how to diagnose a worn belt, and most importantly, when it's time to admit defeat and call a qualified mechanic.
In this article, we’ll explore the process of serpentine belt replacement, offering a DIY guide for those comfortable with basic car maintenance. We'll also delve into the warning signs that indicate a failing belt, the tools required for the job, and a step-by-step process for replacement. Importantly, we'll outline the situations where seeking professional assistance from a mechanic is the wiser choice. By the end, you’ll have a clearer understanding of serpentine belts and whether to DIY or call for assistance.
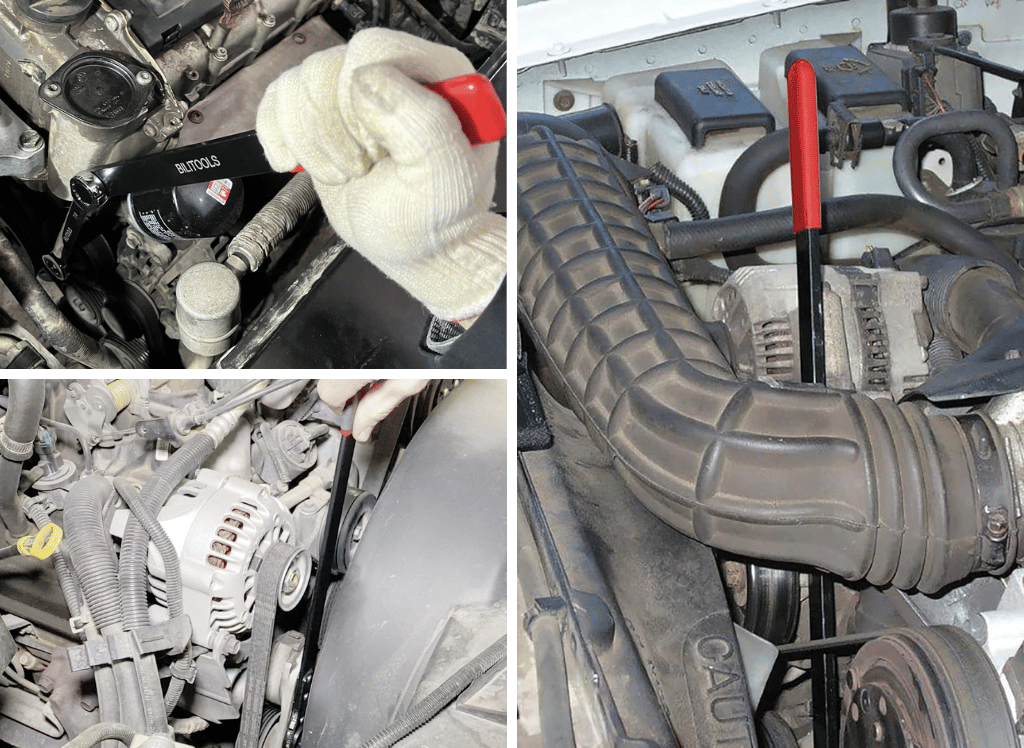
Tools Needed for Serpentine Belt Replacement
My first encounter with a serpentine belt issue was on a road trip. I was driving through the desert when suddenly, the power steering went out, followed by the air conditioning. Panic set in quickly! I pulled over, popped the hood, and saw a shredded belt hanging limply. Luckily, I had some basic tools and a spare belt, thanks to my overly prepared dad's advice. After a sweaty hour of struggling (and a few choice words), I managed to get the new belt on, and we were back on the road. It was a tough experience, but it taught me the importance of regular belt checks and the value of knowing how to do a basic replacement.
Having the right tools for the job is paramount. You'll definitely need a wrench or socket set to release the tensioner pulley. This is the key to getting the old belt off and the new one on. The size of the wrench or socket will vary depending on your vehicle, so consult your owner's manual or a repair guide specific to your car. You might also need a breaker bar for added leverage if the tensioner is particularly stubborn. A serpentine belt tool kit, available at most auto parts stores, can make the job easier, especially in tight spaces. Beyond that, a diagram showing the belt routing is essential, especially if you've never done this before. A flashlight will help you see clearly, and gloves will protect your hands from dirt and grease. Finally, consider having a pry bar handy to help nudge the belt into place if needed. Investing in these tools will not only make this job easier but also prepare you for other basic car maintenance tasks in the future.
Diagnosing a Worn Serpentine Belt
A serpentine belt doesn't just fail without warning. There are usually telltale signs that indicate it's nearing the end of its life. The most common symptom is a squealing or chirping noise, especially when the engine is first started or under heavy load. This noise is often caused by the belt slipping on the pulleys due to wear or glazing. Visually inspecting the belt is also crucial. Look for cracks, fraying, or missing chunks. These are clear indicators that the belt is deteriorating and needs replacement. Another sign is excessive wear on the edges of the belt, which can indicate misalignment of the pulleys. If you notice any of these symptoms, it's wise to replace the belt sooner rather than later to avoid a complete breakdown. Sometimes, the belt might appear fine, but if it feels brittle or hard, it's likely lost its flexibility and needs to be replaced.
DIY Serpentine Belt Replacement: A Step-by-Step Guide
Replacing a serpentine belt isn't rocket science, but it does require some basic mechanical knowledge and patience. First, gather your tools and the replacement belt. Locate the serpentine belt diagram, which is often found on a sticker under the hood. This diagram is crucial for routing the new belt correctly. Next, identify the tensioner pulley. This pulley has a spring-loaded mechanism that keeps tension on the belt. Use a wrench or socket to turn the tensioner pulley, relieving the tension on the belt. While holding the tensioner in the released position, carefully remove the old belt from the pulleys. Now, using the diagram as a guide, route the new belt around the pulleys, ensuring it's properly seated in the grooves. Finally, release the tensioner pulley, allowing it to apply tension to the new belt. Double-check that the belt is correctly routed and seated on all the pulleys. Start the engine and listen for any unusual noises. If everything sounds good, you've successfully replaced your serpentine belt!
When to Call a Mechanic
Complex Routing or Limited Access
While many serpentine belt replacements are straightforward, some vehicles have complex belt routing systems or limited access to the tensioner pulley. If you find yourself struggling to understand the belt routing diagram or having difficulty reaching the tensioner, it's best to call a mechanic. Forcing the issue could lead to damage to other components or improper belt installation, which can cause further problems down the road. Additionally, if you encounter rusted or seized bolts, it's wise to seek professional help. Mechanics have specialized tools and experience to handle these situations without causing damage. Don't hesitate to admit when a job is beyond your capabilities; it's better to pay for professional help than to risk damaging your vehicle.
The Importance of Belt Tension
Proper belt tension is crucial for the serpentine belt to function correctly. Too little tension, and the belt will slip, causing squealing noises and reduced performance of the accessories it drives. Too much tension, and you risk damaging the belt, pulleys, or even the accessories themselves. The tensioner pulley is designed to maintain the correct tension automatically, but it's still important to ensure that the tensioner is functioning properly. If the tensioner is weak or worn, it may not be able to maintain adequate tension, leading to belt slippage. In some cases, you may need to replace the tensioner pulley along with the belt. Consult your vehicle's repair manual for specific tension specifications and testing procedures. A properly tensioned belt will ensure optimal performance and longevity.
Checking Pulley Alignment
Even with a new belt and properly functioning tensioner, misalignment of the pulleys can cause premature belt wear and failure. Misalignment can occur due to damaged pulleys, worn bearings, or bent brackets. To check for pulley alignment, use a straight edge or laser alignment tool to ensure that all the pulleys are in the same plane. If you find any misalignment, you'll need to identify the cause and correct it before installing a new belt. Replacing a damaged pulley or bracket may be necessary. Ignoring pulley misalignment can lead to repeated belt failures and potential damage to other components. Taking the time to check and correct alignment issues will save you time and money in the long run.
Fun Facts About Serpentine Belts
Did you know that the serpentine belt is also sometimes called a multi-rib belt or a poly-v belt? These names refer to the multiple V-shaped ribs that run along the length of the belt, which provide increased grip and power transmission compared to older V-belts. Serpentine belts are typically made from a durable rubber compound reinforced with cords of polyester or aramid fiber. This construction allows them to withstand high temperatures, constant flexing, and exposure to engine fluids. The lifespan of a serpentine belt can vary depending on driving conditions and maintenance practices, but it's generally recommended to replace them every 60,000 to 100,000 miles. A single serpentine belt can drive multiple accessories, simplifying the engine design and reducing the number of belts required. Serpentine belts are a crucial component of modern vehicles, ensuring the proper functioning of essential accessories like the power steering, air conditioning, and alternator.
Step-by-Step Serpentine Belt Replacement Guide: Detailed Instructions
Before you even think about touching a wrench, safety first! Disconnect the negative battery cable. This prevents any accidental electrical issues while you're working. Then, locate your serpentine belt diagram. Usually, it's a sticker right there under the hood. If it's missing, no worries! A quick online search with your car's year, make, and model should pull one right up. Now, identify the tensioner pulley. It's the one with a spring-loaded arm. Grab your wrench or socket and fit it onto the tensioner's bolt. Now, here's the tricky part: you need to rotate the tensioner arm against its spring tension to create slack in the belt. While holding the tensioner in that released position, carefully slip the old belt off one of the pulleys. Then, gently release the tensioner arm. Now, with the old belt out of the way, grab your new serpentine belt. Refer back to your diagram! Carefully route the new belt around all the pulleys, making sure it's snug in the grooves. The diagram is your best friend here! Once the belt is routed correctly, rotate the tensioner arm again, creating slack. Slip the final section of the belt over the last pulley, then slowly release the tensioner arm. Double-check that the belt is properly seated on all the pulleys. A quick visual once-over can save you a headache later. Finally, reconnect the negative battery cable. Start the engine and listen for any weird noises. If it sounds good, give yourself a pat on the back! You've successfully replaced your serpentine belt!
What Happens If You Don't Replace Your Serpentine Belt?
Ignoring a worn serpentine belt is a gamble with potentially serious consequences. A snapped belt can lead to the immediate failure of critical accessories like the power steering, making the car difficult to control. The air conditioning will stop working, leaving you sweltering in hot weather. Most importantly, the alternator will cease to charge the battery, eventually leading to a complete electrical failure and a stranded vehicle. In some cases, a broken serpentine belt can also damage other components in the engine compartment, leading to costly repairs. For example, if the belt shreds and wraps around other pulleys or components, it can cause significant damage. It's also worth noting that if the serpentine belt drives the water pump, the engine can overheat rapidly, potentially causing severe engine damage. Replacing a serpentine belt is a relatively inexpensive maintenance item compared to the potential costs and inconveniences of a complete breakdown.
Top 5 Signs Your Serpentine Belt Needs Replacing: A Quick Listicle
1.Squealing Noises: The most common symptom is a high-pitched squealing or chirping sound, especially when the engine is first started or under acceleration.
2.Visible Cracks or Fraying: Inspect the belt for any signs of cracking, fraying, or missing chunks. These are clear indicators of wear and tear.
3.Glazed or Worn Surface: A shiny or glazed surface on the belt indicates that it's lost its grip and is slipping on the pulleys.
4.Accessory Malfunctions: If you notice that your power steering, air conditioning, or alternator are not working properly, it could be a sign of a slipping serpentine belt.
5.Belt Debris: Finding small pieces of rubber or belt debris under the hood can indicate that the belt is deteriorating and needs replacement. By being aware of these signs, you can proactively address potential serpentine belt issues before they lead to a complete breakdown.
Question and Answer Section
Q: How often should I replace my serpentine belt?
A: As a general guideline, replace your serpentine belt every 60,000 to 100,000 miles, or as recommended in your vehicle's owner's manual. However, it's always a good idea to visually inspect the belt regularly for any signs of wear or damage.
Q: Can I drive with a squealing serpentine belt?
A: While it might be tempting to ignore the noise, driving with a squealing serpentine belt is not recommended. The squealing indicates that the belt is slipping, which can lead to reduced performance of your accessories and eventually a complete breakdown.
Q: What tools do I need to replace a serpentine belt?
A: You'll typically need a wrench or socket set, a serpentine belt tool (optional), a belt routing diagram, a flashlight, and gloves.
Q: How do I find the correct serpentine belt for my car?
A: You can find the correct serpentine belt by consulting your vehicle's owner's manual or by using an online parts finder tool. Be sure to enter your vehicle's year, make, and model to ensure you get the right belt.
Conclusion of Serpentine Belt Replacement: Complete DIY Guide + When to Call a Mechanic
Replacing a serpentine belt can be a satisfying DIY project, saving you money and empowering you with valuable car maintenance skills. However, it's crucial to assess your abilities and the complexity of the job before diving in. By following this guide, you can confidently decide whether to tackle the replacement yourself or seek professional help. Remember to prioritize safety, use the right tools, and pay attention to the warning signs. With a little knowledge and preparation, you can keep your serpentine belt in top condition and avoid unexpected breakdowns.